Showing posts with label SVG Attic DT. Show all posts

Friday, October 28, 2011

DT Friday- SVG Attic

Hi!! It's my Design Team day for SVG Attic and I wanted to share one of the cute boxes from


I made the pie box and put a cute little paper pie in it! I am making 3 different kinds, but I only have one finished to show you today. 

Everybody loves Pumpkin Pie right?!! 

Um... I don't.  I know, I'm weird lol!

But I DO love this pumpkin pie!!


Thanks for stopping by!! 

And make sure you go check out SVG ATTIC because they just released some amazing new sets this week and you're gonna love them!! I can't wait to play with this new one!


And this winter village is soooo cute!!!


Friday, October 14, 2011

Puppy Party with SVG Attic Designs

Hello everyone!! So it's my DT day at SVG Attic again, and I have been saving these party pics for a while now just to be able to show you today! 

This is just a few ideas of how you can incorporate svg files into party planning and decorating!! I threw a Puppy Party for my son a few weeks ago and it turned out AMAZING!! I'll show you just the ways I used svg files for the party, and check back tomorrow for all the rest of the party details and pics..... there is a lot of them lol!!


First there was the invitations, 
which I've already shared with you in this post.


Here's a sign I made and put out on the front door.


And I put up some paw prints on the walls to decorate a little...


Then I made cupcake picks and toppers with the same doggie dish svg.


BTW, all the doggie files are from the svg kit 
Jack's Tracks at SVG Attic.

I have just been loving all the fun ways people have been putting up food
labels and signs on their dessert tables so I did that for this party
by using the dog bone tag svg and flipping and welding to make it into a tent shape. You're gonna get a little peak at some of the cute and creative treats I made too!


For party favors I just gave everyone a decorated sugar cookie shaped like a bone and wrote "Thanks" on it. Then tied them up with ribbon and a bone tag.


Lastly for today, is the dog house I made from a refrigerator box.
The bone dog tag just worked perfectly for so many aspects of this party!
So I stuck it on where you would put a name on the dog house, 
but I ended up leaving it blank so that all the kids could get their pictures taken in the dog house without it saying "Ethan" above them lol!


Thanks for stopping by! Go check out SVG Attic for some awesome files you can buy, and they are VERY reasonably priced!! They are so versatile, and you'll be amazed at how easy they are to work with!

Also, I am having a giveaway right now.... and so far only 5 people have commented to win. It's not that hard people, just say "hi"! :-) Go here: 100 followers GIVEAWAY

Friday, October 7, 2011

Fall Mash Up Blog Hop

Thank you so much for joining us for the
svg attic
Fall Mash Up Blog Hop
have partnered this weekend to bring you fun,
creative, and inspiring projects to jump start your Fall crafting!

Just check out how easy it is to use the adorable PKS face stamps with
SVG Attic's awesome cut files!

If you've just come from Vivienne's blog,
then you are in the right place!

If not, make sure you start at the beginning over at
Peachy Keen Stamp's Blog and the SVG Attic Blog
so you don't miss a single chance to win some fun prizes up for grabs!

PLUS*** For the duration of the HOP SVG Attic is having a SALE!!
Just enter the code "HOP" at checkout to save 30% off your total purchase! 
No minimum requirements!!

The Hop runs until Sunday night, and there will be even more
inspiration tomorrow at some of the other blogs!

Now for my project....... I made a step card! My first one ever!
 From the Step Card SVG Collection.


I'm not sure why, but I find myself creating
scenes out of paper quite often. So I thought it might be fun
to make a corn field/pumpkin patch Autumn scene to decorate my table!!


I used the Pumpkin Patch collection from SVG Attic 
for all the little pumpkins and paired them with 
super cute face stamps from Peachy Keen Stamps!!


 I wanted to make the hay-bale boxes and wagon from the 
Fall Harvest Favor Boxes Collection, but couldn't figure out how to add 
a 3-D wagon to a step card, so I just glued the bales of hay in a little stack in the back.


This is the view from the back of the card.... just so you can see that 
I tied up the bales with twine from Trendy Twine!


The cute ScareCrow is from the new set being released today:
Thankful Friends
I wanted to give him more of a "straw" look so I used the
haystack placecard holder from the Fall Celebration Kit
and reduced it to make tiny little ones! Then I cut them in half
and stuck 'em behind my scarecrow for his hands and feet!!
Cute right! Here's a closer view:


Sorry the pictures aren't better... I no longer own a camera.
It finally quit on me, so all my photos were taken with my phone... :-(
Lame I know.


Don'tcha just love his little face? I can't believe how fun it is to use
Peachy Keen Stamps! You can mix and match facial features and the possibilities are endless!!
I wanted him to look a little scary, since he IS a scarecrow...
and there happens to be a CROW sitting on his shoulder!!!!Lol!

Oh yeah! I almost forgot!!! See that rolled bale of hay on the left side??


I made that with svg files from SVG Attic too! I altered the
Spooky Treat Baskets
in my Jack-O-Lantern project last weekend
and I used that to make the end pieces for the round bale of hay.
The spiral added to the end is the lollipop from Suri's Sweet Treats
collection and I just used a rectangle to form the tube.

Thanks for hopping by!!!
I hope you liked my very first step card!!

Don't forget to leave a comment on each
designer's blog for a chance to win a $50 prize package from
SVG Attic or $50 prize package from Peachy Keen Stamps!!
The deadline for commenting is 11:59pm CDT
Sunday, October 9th.

Your next stop on the hop is:
Janice Wilson

Here's the line-up in case you get lost:
PKS Blog - http://peachykeenstamps.blogspot.com/

SVG Attic Blog(Jessica) - http://svgattic.blogspot.com/
Ruthie - http://septemberninth.blogspot.com/ 
Kathy - http://www.peachykeenstamps-kathy.blogspot.com/   
Kasi - http://19eightyexpressions.blogspot.com/

 
In case you've never heard of them, here's some interesting info
about these two awesome companies!!

SVG Attic was founded early 2011 by Jessica Bashaw and is a family
owned company that operates in Southern California. Jessica provides
fresh, cute, and easy to cut/assemble SVG files for use with
your favorite SVG compatible electronic cutting machine.

Peachy Keen Stamps is a family business founded by Kathy & Dave
Jakopovich in September 2003. They are located in Green Bay, WI and are
the leading manufacturer of the original clear, high-quality, whimsical,
face stamps loved by die cutters internationally!!
Kathy illustrates the entire face line as well as an image
stamp line with the same sweet whimsical look.
Their stamps stamp crisp, clear, and never need to be sanded,
or rubbed with an eraser. Trade quality photopolymer means
that your stamps will last through THOUSANDS of impressions!!!

Tuesday, October 4, 2011

SVG Attic Spook-Tacular Blog Hop Winner!!

What a fun Blog Hop that was huh!!!! 

Thank you all so much for joining us and playing along!! 
I loved reading all your comments and I am  
so thrilled to have so many new followers!! 
Can't wait to share more with you all and hopefully get a chance 
to come visit all of your blogs as well!!

Now on to the winner of a $10 Gift Certificate to


**********Drum Roll Please**********


Via Random.org


And the winner is.......................


Lisa R.

She Said........
"Wow, you go girl, velvet lined coffins eh?
The candy skeletons are cute. TFS"

Congratulations!! Lisa!

Please send an email to info@svgattic to claim your prize!


One more thing!
Did you know that SVG Attic and Peachy Keen Stamps are participating in a co-hop?
There will a bunch of prizes and a TON of inspiration!
Break out your SVG's and PKS face stamps and join us for the  

Fall Mash Up Blog Hop!

It all starts this Friday October 7th!
I hope to see you back here this weekend for the Fall Mash Up Blog Hop!
It starts at 8AM CST on Friday at peachykeenstamps.blogspot.com!


Sunday, October 2, 2011

Spook-Tacular Blog Hop - Day 3

We're on to Day 3 of the SVG Attic Spook-Tacular Blog Hop!!!
If you've been hopping along all weekend then you've seen some pretty amazing projects from my fellow Design Team members to hopefully give you some inspiration for your Halloween crafting.

If you've just happened across my blog, go HERE to start from the beginning of the Blog Hop.
Here's the Line-up in case you get lost along the way:


Don't forget that this weekend in honor of the blog hop you can save 30% off your total purchase at SVG Attic's store by using the coupon code "SVGHOP"!

Also there are some GREAT giveaways happening during the hop, 
such as Gift Certificates at EVERY STOP along the way! 

I am giving away a $10 Gift Certificate to SVG Attic to one lucky hopper! 
I will choose a winner, via random.org, on Monday night and make the announcement Tuesday morning.
All you have to do is:

1. Become a follower of my blog
2. Leave a comment on my first blog-hop project HERE

Plus... If you leave an additional comment on today's and yesterday's blog-hop posts
you will be eligible for 2 EXTRA entries into my giveaway! 
That's a chance for 3 entries to win $10 worth of awesome SVG's!!

Jessica will also be choosing one person to win a $30 gift certificate, and you have a chance at 3 entries for it!!

First entry: Become a follower of SVG Attic's blog 
and leave a comment.
Second entry: Visit the SVG Attic facebook page and become a follower there too! Don't forget to leave a comment saying you did.

Third entry:Visit each blog in the line-up and leave a comment at each one!

For my first project I made coffins with candy skeletons inside. Which would be perfect as party favors for your Halloween Shin-dig, or super cute as invitations if you included a little card with the details inside! 
 
For my second Spook-Tacular project I made a graveyard scene. 
I used the chocolate skeletons and "buried" them in brownies for a Spooky Halloween Dessert!

Okay, on to today's project..... no skeletons or chocolate this time lol!
How about some cute, yet kinda spooky hanging lanterns!
Jack-O-Lanterns that is!!


I used the Spooky Treat Basket files for the lanterns.


 The Jack-O-Lantern faces came from a couple sets:


The leaves and stems I used are from the Fall Celebration Kit.


I used the Spooky Treat Basket set to make the lantern part, 
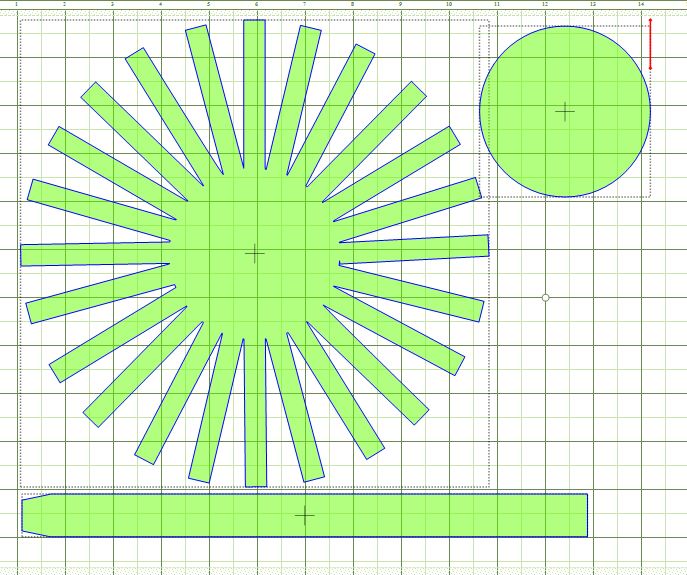
but instead of cutting the sides with lots of strips, like the file comes:

I altered it to make the long rectangle at the bottom taller, 
and the strips shorter to become top and bottom pieces.

But then I decided that I needed to leave the top open a little
so I could get the LED tealights in and out. I made one of
the pieces hinged and took the strips off half of it to make a lid.

They fold up to be able to reach inside!

But if you want a good seal so the lights show up brighter you can
just tuck it down a little into the lantern like this.

I hope you've enjoyed yourself along the hop so far! Thanks for joining us this weekend!!
You're next stop is Jessica L.

And come back to visit next weekend when we will be participating in 
another AWESOME blog hop featuring Peachy Keen Stamps!!

LinkWithin

Related Posts with Thumbnails