I'm so excited to share these photos with you!
The Invitations
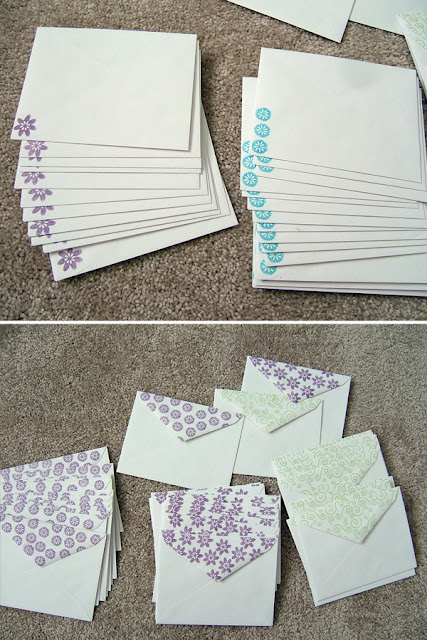
When I make invitations I like to embellish and stamp the envelopes as well. It's like a little hint to the cuteness that waits inside!
Instead of having people spend money on buying a card to go with a gift, they wanted a cute way to request children's books with a handwritten message inside. I thought it was a super cute idea. Has anyone ever heard of this before, because I sure hadn't. I didn't write the poem, and don't know who did since it was supplied to me, but it sure is sweet.
Now for the Diaper Cake,
since that's what you really want to see right?!
I absolutely LOVE the look of the ruffles around the layers!
A 3-D paper crib with beaded mobile hanging above it.
A 3-D rocking chair made of paper, and it really rocks back and forth!!
3-D paper dresser and lamp
The Dresser's bottom drawer actually slides in and out and has a cute little pair of baby shoes and a baby hat inside.
The lamp's base is flat, but it has a 3-D lamp shade with furry trim!
You can see the rug I made out of fabric and furry trim. And the miniature quilt inside the crib. The crib also has a mattress, bumpers, and a skirt!
The changing table and bookshelf are not 3-D but they have some fun baby items on them to look realistic and miniature.
Yes, I handmade all the 3-D furniture for it. It was a ton of work, and a little overboard, but that's the kind of girl I am. I used my Cricut to cut everything out, although not from cartridges. Fortunately for me, my Make The Cut still works with my Cricut, and as far as I understand it, it will continue to work as long as I don't update either the software for MTC or the firmware on my Cricut. I'm keeping my fingers crossed because I don't know what I would do without MTC now, and I just don't have the money to buy a Silhouette or other cutter right now, but that's definitely down the road somewhere ever since the stupid lawsuit between ProvoCraft and MTC!
(If you don't know what Make The Cut is, it's a software program that you can use with your electronic cutter to cut out virtually any shape, without cartridges! However, due to above mentioned lawsuit, it is no longer compatible with Cricut machines.)
Anyways, sorry.... There is still a TON of photos to show you, so I'll get right to it! I will share some more details about how I made the furniture at the end of the post if you're interested.
The Diaper Carriages: I made three, but failed to take pictures of them all together...
Again I used some ruffle fabric on the Diaper Carriages and it just looks so cute and really tied everything together.
The Party Favors
They looked so classy all stacked into a pyramid on the table by the Diaper Cake!
The Banner
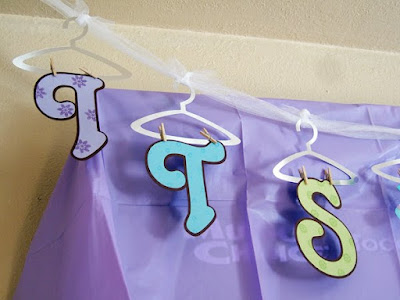
There wasn't a "perfect" place to hang the banner, so I used a tablecloth to cover up their flatscreen and hung it across that.
I used miniature clothespins to hang the letters from metallic paper hangers. The paper I used for the hangers has a great reflective quality, you could use it as a mirror if you wanted!
I think the banner turned out so adorable with the little baby clothes hung in between the words and at the beginning and end.
The Tableware
I made napkin rings with 3-D flowers and wrapped fabric and ribbon around a clear container to hold extra forks.
I made bands to go around the cups with matching flowers layered on them.
I didn't make any of the food or set up the food table, but I tried to pretty it up the best I could by making cute little food picks with babies and flowers on them. :-)
Thanks for checking out all my pictures of "The Nursery" Baby Shower!
Keep reading if you want to know more about how I made stuff for this party.
Now, I want to kinda walk you through the process of how I got my inspiration for this baby shower.
I wasn't given a theme to work with, just a photo of a bedding set at Babies 'R Us, and a color scheme that needed to incorporate flowers. The colors are Purple and Brown, with Teal and Green accents. The colors are so soft and peaceful together but still very modern and fresh. But without a concrete theme, my creative mind hit a brick wall and I was really drawing a blank about how to proceed. Here's the photo I was given.
What I came up with after staring at this photo for days was to use this nursery as my inspiration for the whole shower....
Starting with the Invitations, I hand stamped papers to resemble the patterns found on the Babies 'R Us bedding. The dotted circles on the "sheet" resembles the dotted flowers on the real thing. The flowers on the actual quilt and wall art I incorporated into the invitation quilt as well. The invitation mimics the nursery theme all the way down to the chair rail on the wall, and the paper lace crib skirt.
After the invitations were finished and sent out, then came the brainstorming...
Check out how similar the hand drawn quilt and the miniature are! However, don't pay close attention to my horrible drawings of the dresser and crib at the top!! (Bet you couldn't even tell that was a crib huh!) Lol!
The 3-D furniture took me A LOT of time to make! They were so tiny and so detailed.
I made the mobile by bending a pipe cleaner into the shape I wanted, wrapping it with ribbon, and tying beads on strings dangling from it.
The quilt is actually a miniature quilt! I sewed tiny squares together to make the top and layered it with batting and a piece of fabric on the back. The binding looks horrible, it was just so difficult on such a tiny piece! But no one really noticed.
The crib has a mattress made out of foamcore wrapped in batting and fabric. The bumpers are rectangles of cardboard wrapped the same way. I even tied little bows on the sides of the crib to look like bumper ties. The skirt was easier just to make with my Martha Stewart Doily Lace border punch instead of trying to glue tiny pieces of fabric under there.
The fabric for the rug was a velvety corduroy type, and the best part is, I got it for FREE! I only needed a tiny piece, and JoAnns will cut you a sample piece of fabric if you ask them. I glued the furry trim around the rug. My hot glue gun has become my best friend!
All the furniture that was supposed to be "wood" I used my "distressed stripes" Cuttlebug embossing folder to give it that texture.
The rocking chair was seriously so cute and functional!
And here's the best part... You can make one too!! Free instructions online here: http://www.instructables.com/id/How-to-make-a-Paper-3d-Rocking-Chair-5quot-high/
They give you this pattern which you can print out and then handcut.... but since I already went and did all the work to turn it into an SVG, I figured I'd be nice and share it with ya! Here's the silhouette if you want to do it yourself, or just leave me a comment with your email for the actual SVG file.
The dresser has one functioning drawer, and I used mini flower brads as the drawer pulls. The baby shoes and hat are stickers.
I'm not going to explain how I made the dresser, it's just too in depth. However, the drawer part is easy enough. It works like a matchbox. There is a rectangle "casing" that the little box slides into.
(I'm quite the expert on matchbox style drawers! If you haven't already seen my desk organizers, check them out next!)
The Lamp looks like it's lit up, but it's not. Lol! It's pretty cool though! There was a Scentsy warmer behind it that was casting a beam of light onto it!
And here's the lamp if you want to make one too!! Again, I also have it as an SVG so let me know if you would like that instead!
Here's the other shade too if you want it 3-D! I used a pipe cleaner to make a circle on the end that would fit up snugly into the lamp and bent it so a straight piece came down and I could glue it to the back of the lamp base.
The Changing Table and Bookcase
I wasn't sure about the Changing Table at first because it's set up on an angle and it just kept looking weird to me, but after I put a few baby items on it I liked it better.
Here's the link to where the changing table image came from.
http://www.canstockphoto.com/diaper-changing-table-5426995.html
And here's the bookcase.
So I used my stamps and inkpads to add flowers and tie in the color scheme on most of the furniture, makes it look cute right! I used Close to my Heart Ink and some dollar stamps from Michaels. I also stamped on the banner letters.
Now details about the banner!
I was trying to carry on the theme of the "baby's nursery" so I thought it would be cute to hang the banner from little hangers with baby clothes!
I used the New Arrival and Paper Doll Dress Up cartridge for the baby clothes except the socks.
I won't bore you with pictures of EVERY letter! But just a few close ups to show you the stamping I did on the letters to tie in the flowers and color scheme.
The font I used for the letters is called Christie.
The hanger comes from the New Arrival cartridge. I turned and twisted them to fit as many as I could on a 12x12 so I thought I'd share that with you too.
The Party Favors
The favor bags started out as these cute store-bought bags, but it's just not my style to leave them as-is. Plus I didn't really think they were the right colors for the party.
The little pregnant lady on them was cute so I left her showing on just the front and covered up the back with a "Thank You".
The Tableware
I used these handy dandy punches to make the napkin rings, cup bands, and food picks.
The cute baby images come from a Lettering Delights graphic set called 'Be My Baby'. You can check it out here.
I used my swiss dots Cuttlebug embossing folder to make the little raised dots on the cup bands and napkin rings.
So that's it! Thanks for checking out my 'The Nursery' Baby Shower.
Leave me a comment if you like what you see, or have any questions! Don't forget, I have lots of SVG's I can share if you leave your email address in your comment!
Oh Yeah! Be Sure to come visit my Facebook Page and "Like" me to get details on all my upcoming parties!


